This guide is a complete blue hive version for players setting up their Natro Macro to effectively make honey & progress in BSS!
For any questions/suggestions join the Meta Bee Discord Server or comment down below.
Gather
Your gathering settings are the most crucial part of macroing for a blue hive. The main thing you want to focus on in a good gather setting is two factors:
- Time spent gathering
- The macro pattern.
The first part depends on you – how fast you fill, what is your balloon blessing, etc. In general, the best way to do that is just checking what works best for you. Macro for an hour or a few hours with x time set, then y time etc. to check which makes you the most. As a baseline time use 10 minutes, and you should never go above that. You can try lower values – 9m, 8m, 7m, but going higher is usually not a good idea.
Patterns
There are a lot of macro patterns and a lot will also be made in the future. Here I will put a few ones that are currently considered to be the most efficient (public) patterns for honeymaking, together with settings for them. To download these patterns, simply click on this Google Drive Folder and select the pattern you wish to download. Alternatively, all the downloads are in BSGH.
Miku – Tideshift
- This pattern will start near the center of the build and you don’t need to worry about if it will eventually make a way towards the corner.
- The camera faces Hives/Rose Field and faces the camera at Cactus Afterwards.
- Requires Shift Lock
- Doesn’t require drift comp on.
- Recommended to use 5 or 7 Cycles/Reps for the [Width]
- Recommended with Tide Popper or Petal Wand.
- Highly recommended to have AT LEAST 25+ Fps to avoid the possibility of Drifting out of the field.
- Have Supreme Saturator.

Kirara – Tideshift
- This pattern will start near the center of the build and you don’t need to worry about if it will eventually make its way towards the corner.
- The camera faces on Hives/Rose Field
- Requires Shift Lock
- Doesn’t require drift comp on.
- Recommended to use 5 or 7 Cycles/Reps for the [Width]
- This has [No Gather Interrupt] activated.
- Recommended with Tide Popper or Petal Wand.
- Highly recommended to have AT LEAST 25+ Fps to avoid the possibility of Drifting out of the field.
- Have Supreme Saturator.

Pineshift-Redux
- Does not require supreme saturator
- Does not break with haste
- Has minor drift depending on your lag (not out of field, if you have bad lag though I don’t recommend using this pattern)
- Gathers under the big pine tree by honey bee
- gtf and wf pinetree go in the paths folder
- Pineshift-Redux goes in the patterns folder
- Disclaimer: If you use this, you will not be able to use other patterns without putting the original gtf and wf pinetree files back in natro (downloads are in BSGH)

UltoPineShift
- A digital bee pattern for pine tree, if you don’t have digital, Pineshift-Redux is a modified version of the pattern for hives without digital.
- You’ll still need to replace two path files, now gtf-pinetree.ahk and wf-pinetree.ahk, but you’ll also need to replace/edit natro_macro.ahk due to a bug.
- Place __natro_macro.ahk into the submacros folder.
- Place gtf-pinetree.ahk and wf-pinetree.ahk into the paths folder Place ultopineshift.ahk into the patterns folder.
- Disclaimer: If you use this, you will not be able to use other patterns without putting the original gtf and wf pinetree files back in natro (downloads are in BSGH)

Kodoku-Kyomu
- The Width number changes the number of loops before alignment.
- The more you drift the lower you want Width.
- The Size increases or decreases the size of the pattern.
- Auto disables alignment when drift comp is enabled.
- Does not work with old kirara pine tree path.

Snail Dance V3
- Used when killing Stump Snail with a few adjustments.
- Size and Width are enabled, with Size acting like normal, and Width changing the number of cycles before it aligns with Supreme Saturator.
- The pattern movement itself is unaffected by Width.

Collect & Kill
View the image below to see which options should be toggled within the Collect tab:
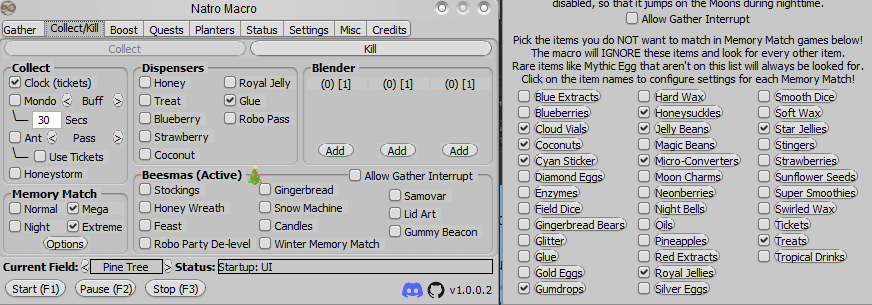
Possible Changes to the Collect tab
- You can turn on Auto Blender for blue extracts, enzymes, oil or any other Mats which you generally need.
- At the loot option from memory matches, you can select anything you actually want, and turn off anything which you really do not want.
- While you can keep everything on, it is advised to disable some practically useless settings which only make you get better loot in memory matches less often, like Treats, Royal jellies, Micro Converters or Cloud vials.
- You can enable killing Mondo Chick or just getting the buff from it, but it will only really be worth your time if most of the people in your private server are also doing that.
- If you are low on ant passes and/or are trying to get a better amulet, you can turn on ant pass collection. Making the macro do the ant challenge itself however will never result in good scores, so stick to doing that manually.
View the image below to see which options should be toggled within the Kill tab:
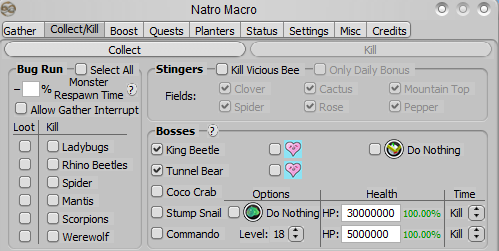
Possible Changes to the Kill tab
- You can enable Stump Snail for the loot and possibly for the amulet if you do not have a good one yet/are trying to get a good one.
- You can enable Coco Crab if you do not have time to do it yourself, however, if you can I would suggest killing it manually.
- Make sure to adjust the monster respawn time accordingly.
Boost
View the image below to see which options should be toggled within the Boost tab:
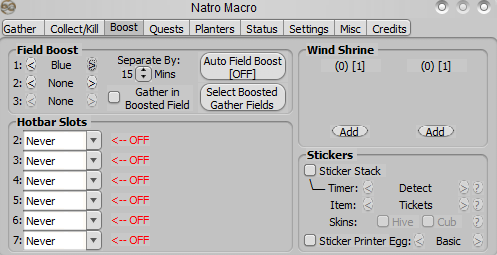
Possible Changes to the Boost tab
- You can enable auto blue extract usage via hotbar slots, which is generally recommended. Use it while gathering and every 10 minutes.
- If you want to, you can enable auto donations of blue extract to the wind shrine. This might solve some problems regarding filling with the extra instant conversion and also serves as a nice pollen buff while being relatively cheap. This will also make Windy Bee even more beneficial due to the clouds on the field.
- Enzymes and oil are a good buff as well, however, you do not make the mats for them (sunflower seeds and pineapples) back while macroing on pine. If you are going to use them, set the settings to while gathering and every 10 minutes.
- Using auto field boost with glitter and/or dice is only recommended during honeyday (unless you are really, really rich).
- Sticker stack should only be run if you have 250-270+ stack and get on Leaderboard so you can fund the tickets you lose. Keep in mind you still have to do either stick or robo often to keep up with how many tickets you use.
Quest
Disclaimer: Enabling any quests while having gather interrupts turned off, as otherwise, your honeymaking will take a much harder toll while the amount of quests done won’t change much.
- It is recommended to have at least 1000 polar power to be able to macro without your bees always going to sleep.
- You can also keep going after that as realistically having a lot of polar power is always good.
- Onett removed the double reset regaining energy for your bees, which is why it is at 1000 minimum instead of the prior 500.
- It is the easiest way to reach quest grandmaster for the 2.5x capacity buff without losing out on honey from quest macroing.
- Honey Bees quests give a temporary 2x convert rate buff, but they majorly scale up with time. You can auto-enable it for the extra buff, however, it’s only recommended to do during Honeyday as the quests scale up fast.
Planters
View the image below to see which options should be toggled within the Planters tab for Manual planter settings:
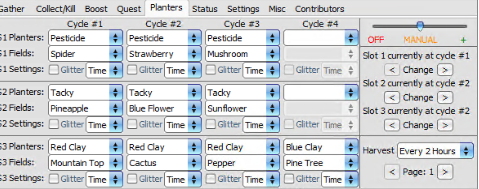
Owning any endgame planters
- If you have hydro, you can replace the blue clay on pine tree with it OR replace the tacky in blue flower AND pesticide on strawberry with it.
- If you have petal planter, you can replace the tacky in pineapple and tacky in sunflower with it.
- If you have heat-treated, you can replace all the 3 red clays with it.
Not owning any endgame planters
For those who macro 24/7 but do not currently own any endgame planter (hydroponic, heat-treated, petal), the easiest way to juggle and keep up all 5 nectars, follow this method:
- Get max invigorating nectar and put it into the nectar pot.
- Using planters+ or other manual settings grows max comforting, refreshing, motivating and satisfying nectars.
- When you have those 4 maxed, get invigorating out of the nectar pot and switch to the manual settings in the image to keep up all 5 nectars.
Status
It is highly recommended that you learn how to create and set up a Webhook so that you know at all times if your macro is working properly and there are no problems with the macro running, as well as getting information regarding buff uptime and your general honeymaking to adjust your hive.
If you want to extend this solution, you can also control your macro via remote control which essentially allows you to write commands like ?start , ?stop , ?keep , replace and so much more.
- View a quick YouTube Video on how to create a Webhook
- View a quick YouTube video on how to set up remote control
Settings
Settings tab should be self-explanatory as long as you set the following:
- Private Server Link (if applicable)
- Hive Slot number
- Movement Speed
- Number of bees
- Sprinkler type
and anything else that applies to you in any of the sections of the tab.





Which pattern would be the best? I have SS, SSA, Tide Popper and the base blue hive composition this website listed.